Now that everything is set up, it’s time to actually use it. The previous post walked through the workspace configuration. This one covers the development loop itself, how you get your app into files, how you work with those files, and how you push changes back.
The Core Loop
The basic APEXLang development workflow comes down to three steps: export, edit, import. You export your application from APEX into local files, make changes to those files, then import them back. That’s it at the high level.
What changes depending on how you work is the middle part, the editing step. That’s where AI assistants come in, and that’s what most of this post is about.

Exporting Your Application
Before you can work with APEXLang files, you need to get them on your local machine. There are a few ways to do this depending on your setup and what you have at hand.
The export splits your application into individual files organized by component type. Pages, regions, items, processes, dynamic actions, each gets its own file. Once the export is done, you have a local copy of your application that your AI assistant can read, understand, and modify.
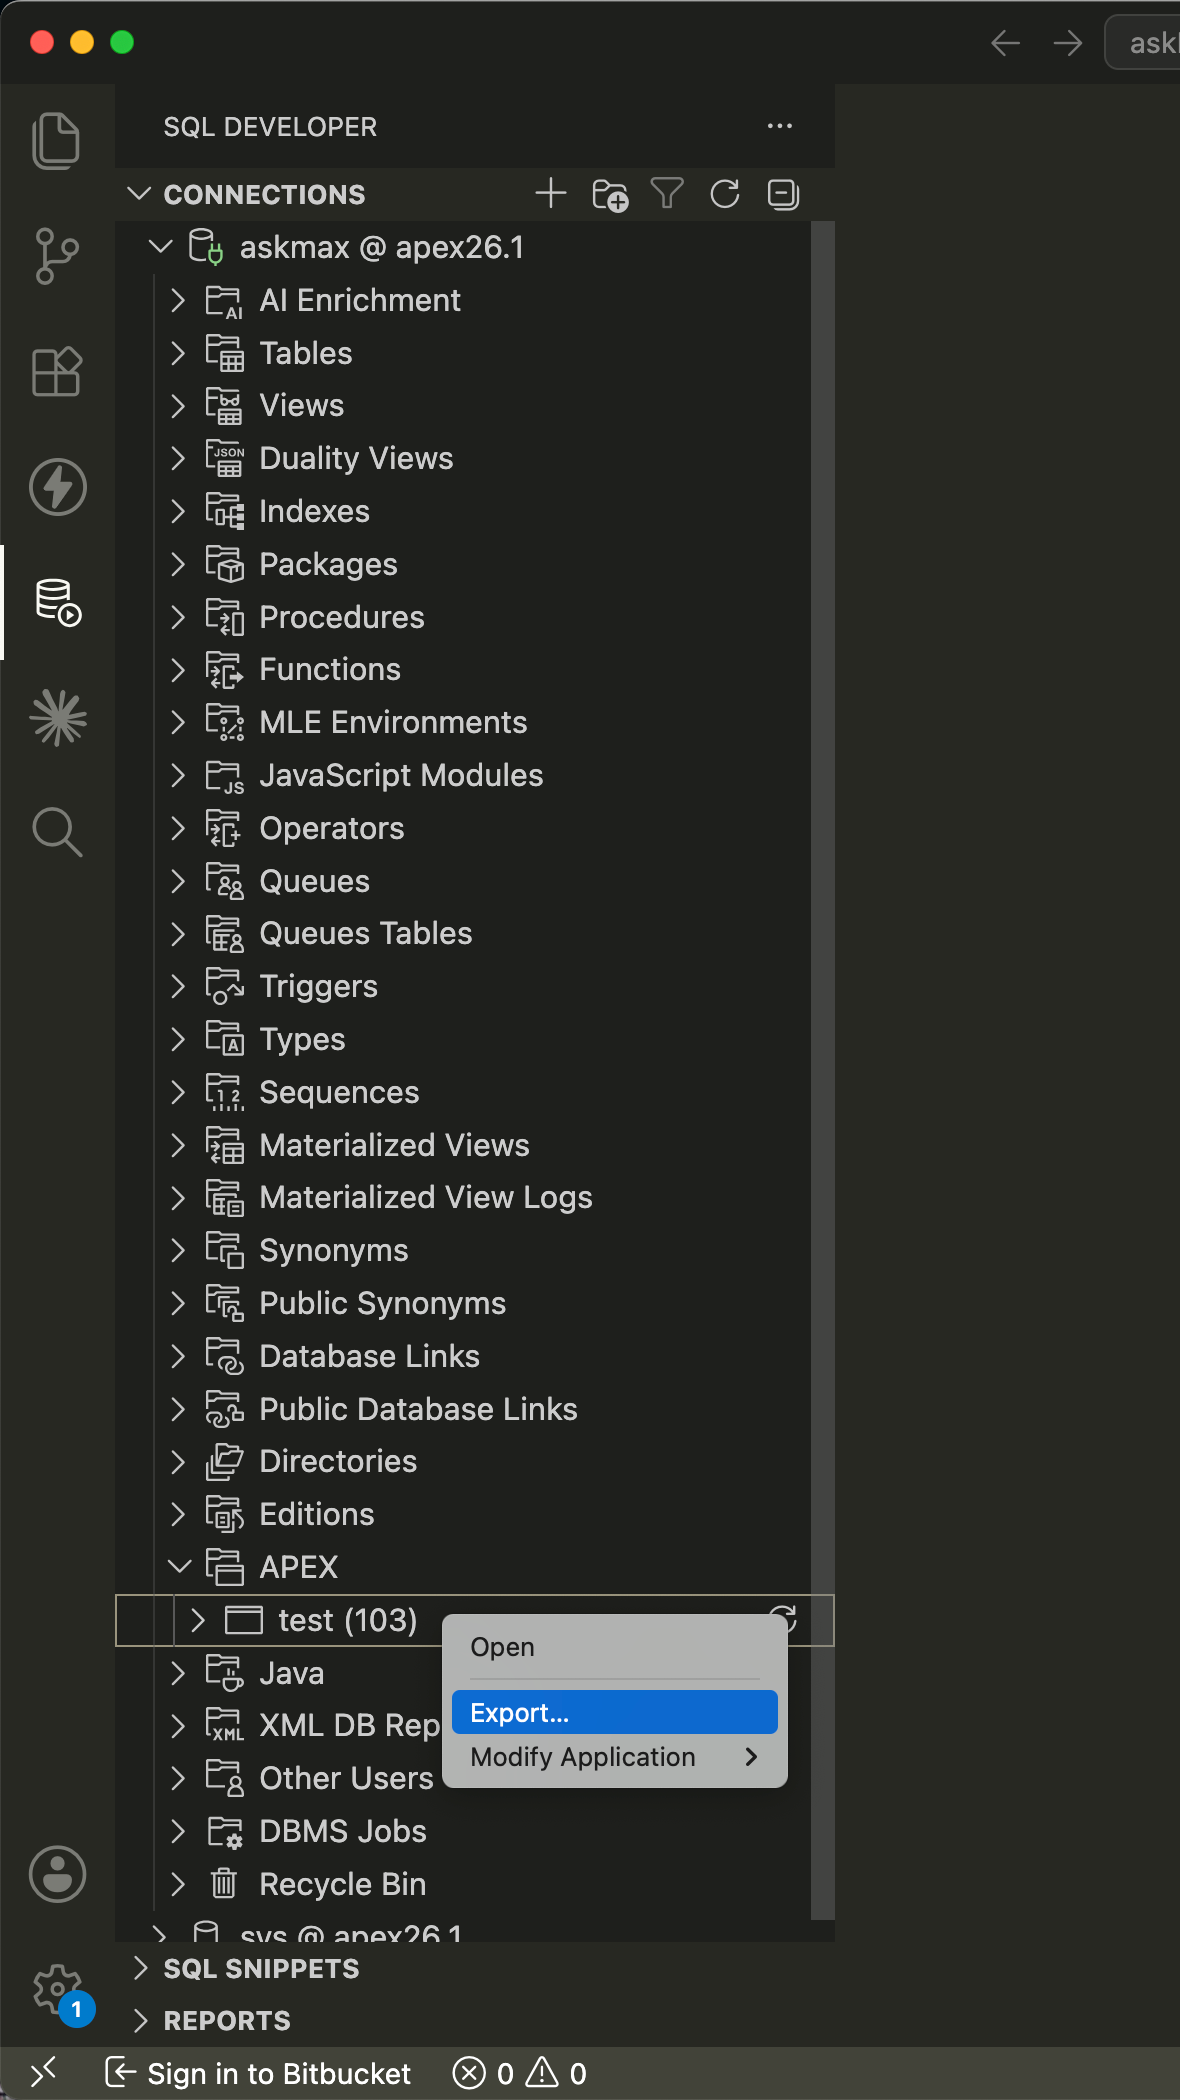
Option 1 - SQL Developer extension
The most straightforward option if you’re already in VS Code. Connect to your database, expand the APEX node in the connection tree, right-click the application you want to export, and select Export. Review the export options, adjust anything you need, then click Apply. The files land in whatever folder you point it to.
Option 2 - SQLcl
If you prefer the command line or want to script the export, you can run the apex export command directly from SQLcl. This is also what the SQL Developer extension uses under the hood.
Option 3 - The export command
If you set up the .claude/commands/ folder from post three, you already have an export command ready to use. Run it from Claude Code and it handles the export for you, including confirming the target folder and listing what changed.
Option 4 - APEX Builder
You can also export directly from the APEX Builder without any local tooling. Go to your application, open the export options, and download the APEXLang files from there and extract the content. The files are identical to what you’d get from the other methods, it’s just a different entry point. Useful if you don’t have VS Code or SQLcl set up yet, or if you’re working on a machine that isn’t your usual development environment.
Two Ways to Work
Once your files are local, there are two different approaches to making changes. They suit different situations and it’s worth understanding both before you pick one.
Vibecoding
Vibecoding is the fast, iterative approach. You describe what you want in plain language and let the AI generate or modify the files directly. No spec, no formal structure, just a prompt and a result.
It works well for:
- Proof of concept work where speed matters more than structure
- One-off changes where you’re not planning to iterate heavily
- Exploring what’s possible before committing to an approach
The limitation shows up when you need to revisit the work. If you come back to a vibecoded app three weeks later and ask the AI to make changes, it has to re-read and re-understand everything from scratch. Each session starts over. That tends to mean more tokens, more corrections, and results that can drift from what you had before.
Specs-based development
The specs-based approach adds a layer of structure. Before the AI makes changes, you have a written spec that describes what the application does, its pages, its data model, its business rules, its conventions. The AI works from the spec rather than from the raw files alone.
It works well for:
- Existing applications you plan to keep modifying over time
- Team projects where multiple people need to understand the app
- Any situation where you want changes to be surgical rather than sweeping
The payoff is in the second change and every one after that. Because the spec captures intent, the AI doesn’t need to re-derive it every time. You update the spec, ask the AI to apply the change, and it knows exactly what it’s working with. Fewer tokens, more predictable results, less drift.
Here’s a simple way to think about the two approaches:
| Vibecoding | Specs-based | |
|---|---|---|
| Best for | POCs, quick iterations | Existing apps, long-term projects |
| Starting point | A prompt | A spec document |
| Repeatability | Low, each session starts fresh | High, spec carries context forward |
| Token cost | Higher over time | Lower over time |
| Setup time | None | Some upfront work |
Neither approach is wrong. A lot of projects start with vibecoding to get something working, then move to specs once the structure is clear and the work becomes ongoing.
Importing Back
Once you’re happy with the changes, it’s time to push them back into APEX. Unlike the export, the SQL Developer extension doesn’t handle imports yet. There are three ways to do it depending on what you have at hand.
The most direct option is using the import command from your project folder. If you set up the .claude/commands/ folder from post three, you already have an import command ready to use. It’s a utility built on top of SQLcl that automates the process. It runs the validation pass first, then handles the import, so you don’t have to run the two steps manually each time.
You can also run the apex import manually or through another method of automation.
The third option is the APEX Builder itself, which has an import option for APEXLang files.
Whichever method you use, run a validation pass before importing. A failed import replaces your entire application with no rollback. Make sure your changes are committed to Git before importing. If something goes wrong, you have a clean state to go back to.
Note:
As of APEX 26.1, import replaces the entire application. There is no way to import a single page or component in isolation.
Things Worth Knowing Before You Start
A few things that tend to trip people up early on.
Keep CLAUDE.md short and focused. There’s a practical limit to how many instructions Claude Code follows reliably, somewhere around 150 to 200 lines before compliance starts to drop. For each line in your CLAUDE.md, ask: would Claude make a mistake without this? If the answer is no, cut it. A tight, focused CLAUDE.md outperforms a long one every time.
CLAUDE.md is not the place for Oracle skills. The Oracle skills handle the APEXLang grammar and compiler rules. Your CLAUDE.md should cover your team’s conventions on top of that. Mixing the two makes both harder to maintain.
Context fills up faster than you’d expect. Long sessions on large applications can start to drift as the context fills. If Claude Code starts producing things that ignore instructions it followed earlier, that’s usually the cause. Use /clear to start a fresh session, or /compact to compress the history. Running focused, single-task sessions gives better results than one long marathon session.
Don’t correct the same mistake twice in the same session. If Claude Code gets something wrong and you correct it, and it makes the same mistake again, don’t correct it a third time. Use /rewind to go back to the last good state, or /clear and start fresh with a better initial prompt. Repeating corrections pollutes the context and usually makes things worse.
Update CLAUDE.md when Claude makes a mistake. When Claude Code does something wrong that your CLAUDE.md should have caught, add a rule for it. Over time your CLAUDE.md becomes a living document shaped by real mistakes rather than assumptions about what Claude needs to know.
Two sources of change means two sources of conflict. APEX Builder and APEXLang files can both modify the same application. If someone makes a change in the Builder while you’re working on the files locally, one of you will overwrite the other on the next import. A clear team agreement on when to use the Builder versus files, and a habit of exporting before starting any local work, goes a long way toward avoiding this.
Working copies are your friend when collaborating. As of APEX 26.1, APEXLang import replaces the entire application, there is no way to import a single page or component in isolation. If two developers are working on the same application at the same time and one imports, the other’s changes get overwritten. The recommended approach is for each developer to work in their own APEX Working Copy, make their changes there, and merge back to the main version when ready.
Always validate before importing. Never import an APEXLang file without a clean validation pass first. A failed import replaces your entire application. There’s no partial import and no automatic rollback. If something goes wrong, you’re re-importing from the last clean export.
Commit before you import. Before any import, make sure your current APEXLang files are committed to Git. If something goes wrong, you have a clean state to go back to. Think of it the same way you’d commit before a deploy.
Time to put it all together.